Case Study Stable Diffusion · Diffusers · CLIPSeg · Streamlit · PyTorch

StudioAI — generate, refine, paint beyond the frame.

A Stable Diffusion pipeline built from first principles. The real question: how much does each hyperparameter actually matter — and how do you build a full editing workflow on top of generation?

Role AI Engineer Duration 2 weeks · Solo Context Bangkit · BFGAI Challenge Stack SD v1.5 · Diffusers · CLIPSeg · Streamlit · PyTorch Deliverable Research notebook + Streamlit app + demo video
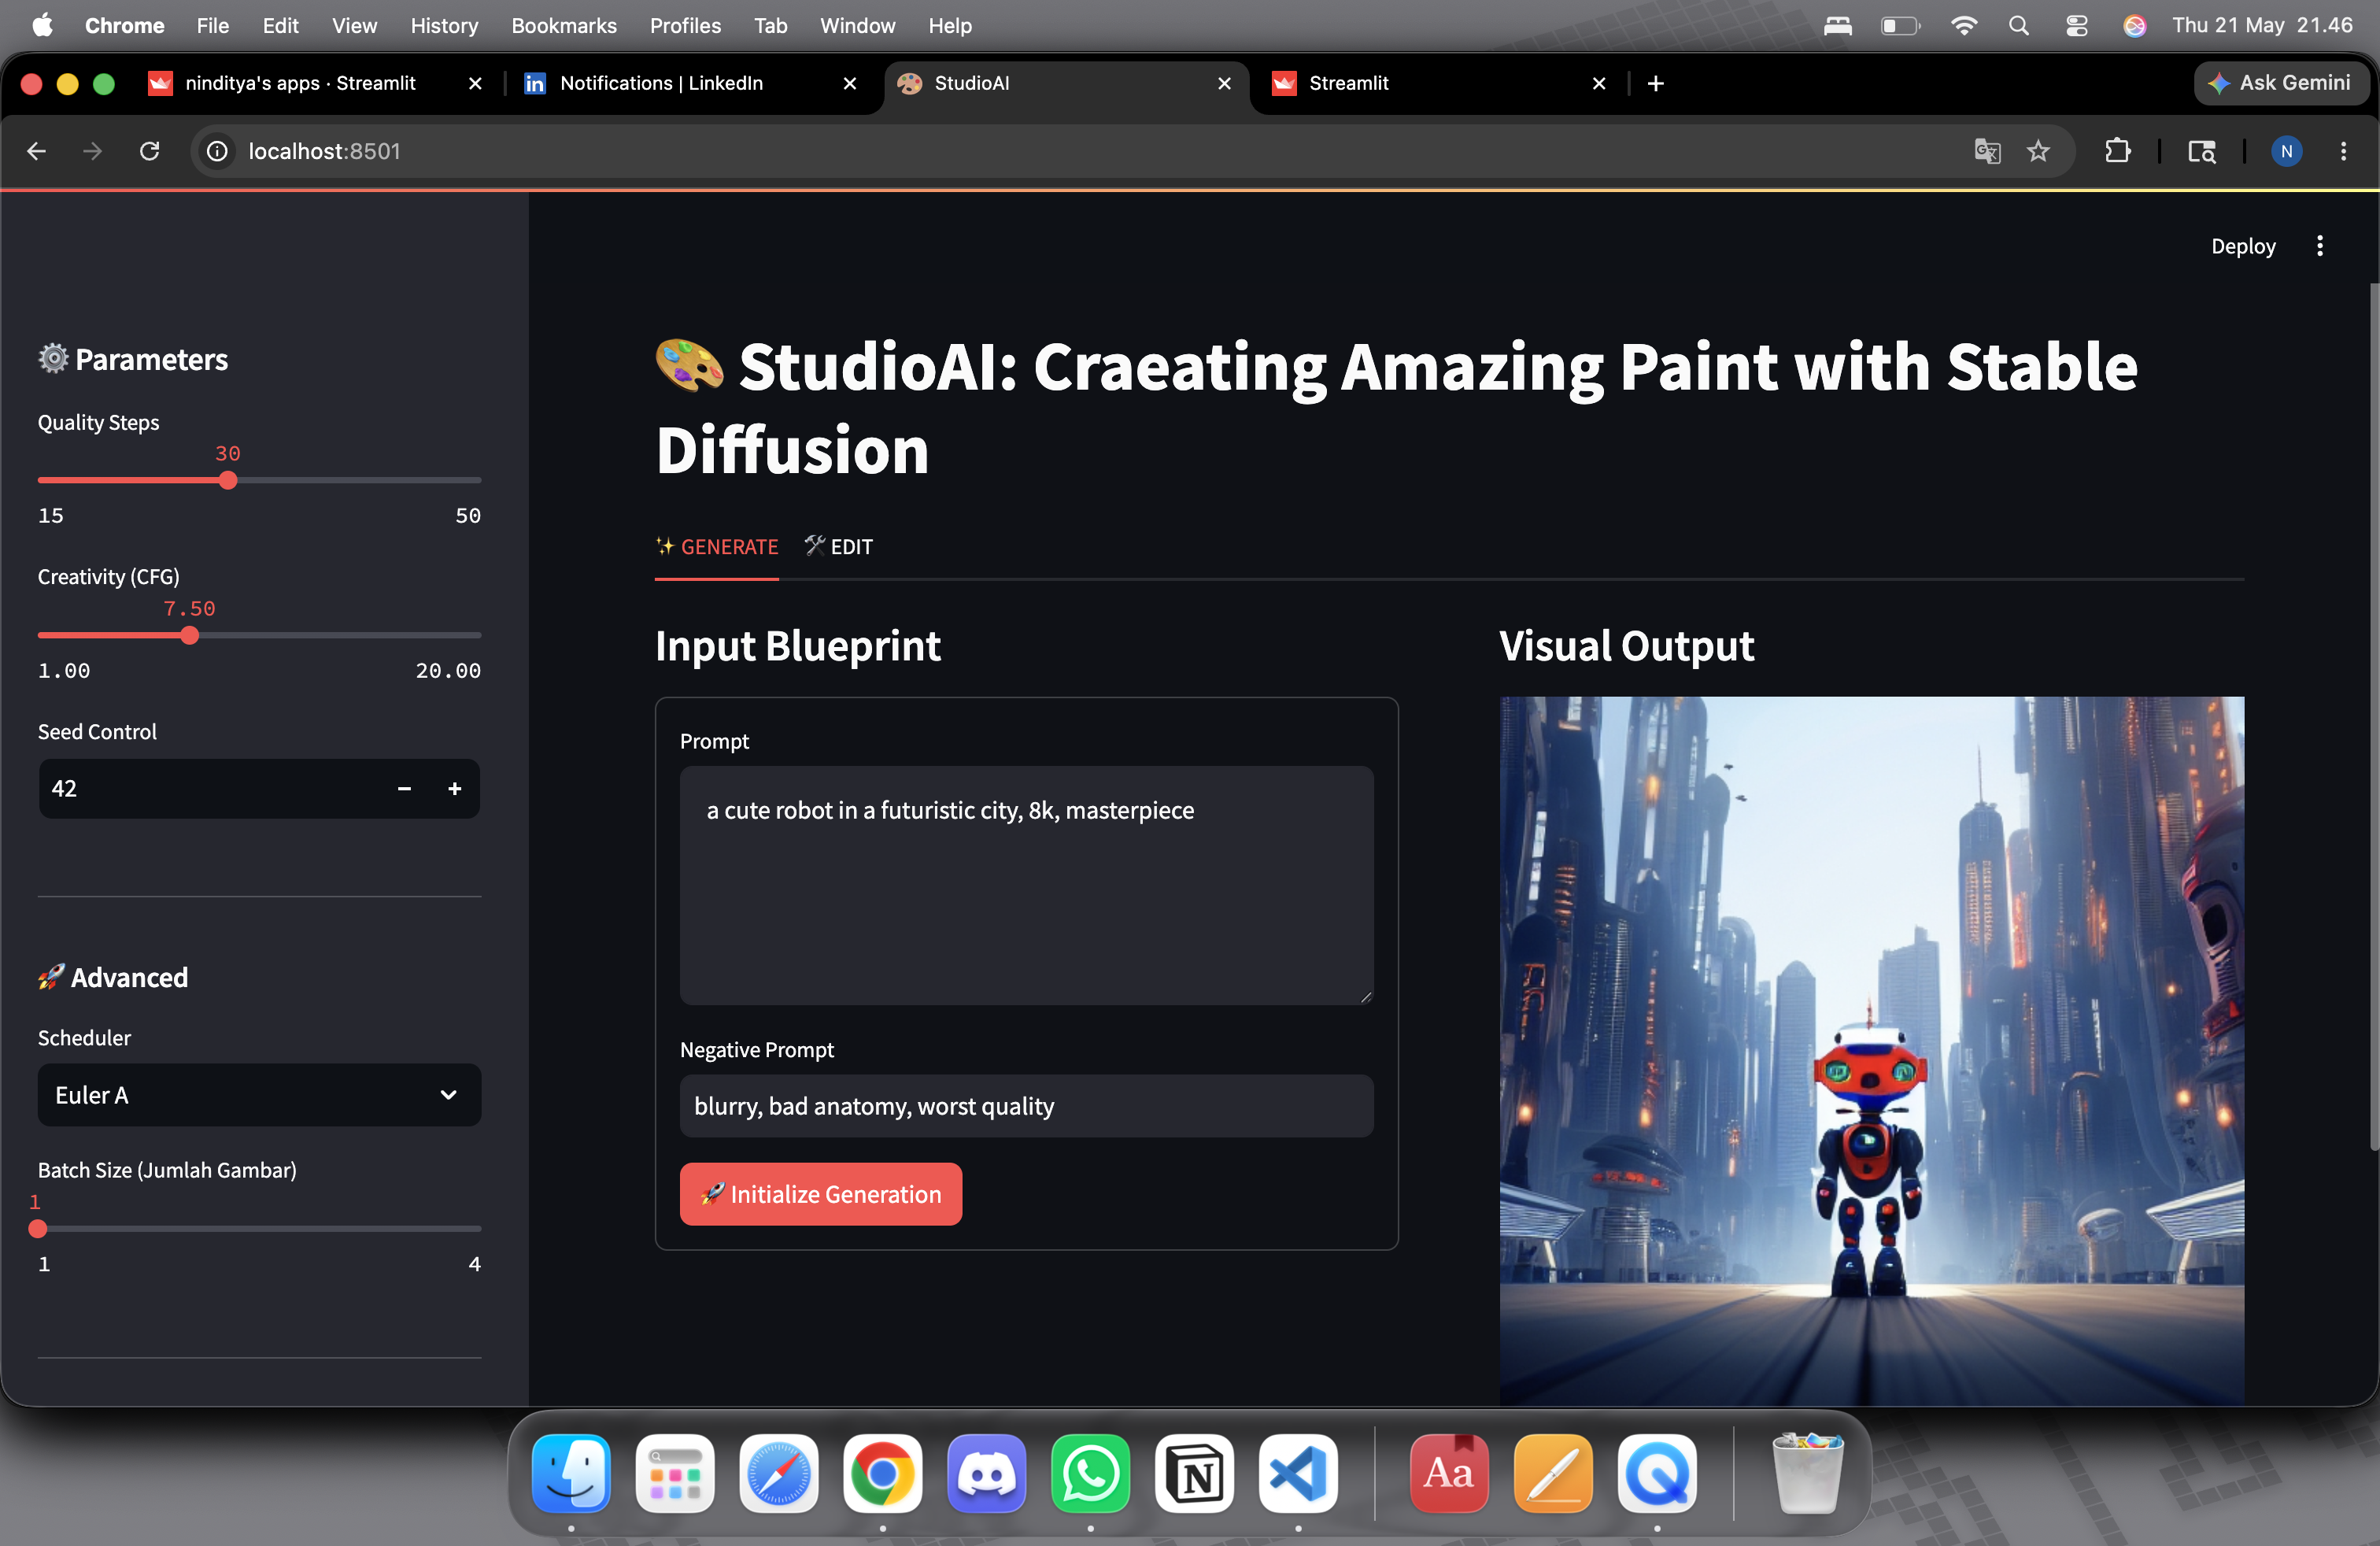
StudioAI running in Streamlit — Generate tab with sidebar controls and visual output

StudioAI in Streamlit — Generate tab active. Left: parameter sidebar (Quality Steps, CFG, Seed Control, Scheduler). Right: prompt input and generated output.

4
Scheduler variants
compared head-to-head
3
Masking approaches
manual · auto · segmentation
2
App tabs
Generate + Edit
3GB+
Model weights
managed in GPU memory
01 · Executive Summary

Understanding GenAI from the inside out.

Every tutorial shows a prompt going in and an image coming out. Nobody shows you what happens when you change guidance scale from 2 to 15 — or why 50 inference steps costs more than 5 but doesn't always look 10× better.

Problem

Black-box tools hide model behavior

Most generative AI interfaces abstract away every parameter. You can't learn the model by using the app — you need to see the internals.

Solution

Built from scratch with full control

Implemented Stable Diffusion v1.5 via HuggingFace Diffusers — text-to-image, inpainting, outpainting, and CLIPSeg auto-masking — with every parameter exposed and comparable.

Outcome

Deployed interactive platform

4 schedulers compared, 3 masking approaches, Streamlit app deployed via Ngrok from Google Colab — usable by non-engineers with no code.

"The hardest part wasn't getting it to generate. It was knowing what to change when the output was wrong."
02 · User Impact

Who uses it — and what they get.

StudioAI bridges the gap between "I generated an image" and "I understand why this image looks like this."

01

No code required

Paint a mask, type a prompt, click generate. The engineering complexity lives inside the pipeline. The user only needs a paintbrush and a sentence.

02

Experiments, not magic

Every parameter is visible and adjustable. Change CFG from 7.5 to 15, swap DPM++ for Euler A, compare outputs side by side. The model's behavior becomes predictable, not mysterious.

03

Full editing workflow

Generate → select → inpaint → outpaint → download. One session, one tool. No switching between three different apps to complete a creative editing workflow.

03 · System Architecture

Two files, one responsibility each.

The Streamlit app separates generation logic from UI rendering. This wasn't over-engineering — it was the only way to keep the notebook-to-app translation manageable.

L
logic.py
Logic layer
All model loading, caching, and generation functions. No Streamlit imports — pure Python that takes inputs and returns images.
  • load_pipeline(scheduler) → pipe
  • generate(prompt, neg, steps, cfg, seed)
  • inpaint(image, mask, prompt, strength)
  • outpaint(image, direction, prompt)
A
app.py
UI layer
Streamlit components, tab layout, drawable canvas, session state. Calls logic.py functions — no model code lives here.
  • Tab 1: Generate (prompt → grid)
  • Tab 2: Edit (canvas → inpaint / outpaint)
  • Session state: current_image, history
  • "Flush RAM" GPU cache clear
D
Deployment
Ngrok tunnel
Streamlit runs on localhost inside Colab. Ngrok creates a public HTTPS URL — no paid cloud deployment or server config needed.
  • pyngrok creates tunnel on port 8501
  • Public URL shared for demo access
  • Session lifetime tied to Colab runtime

Model caching — why it matters.

SD v1.5 weighs 3.44 GB. Loading it takes 15–30 seconds on a T4 GPU. Without caching, every generation request reloads the full model from disk — making the app unusable. The solution: @st.cache_resource keyed by scheduler name. The model loads once per session. When the user switches from DPM++ to Euler A, only the sampler is swapped — U-Net weights stay in GPU memory.

# logic.py — cache model by scheduler to avoid full reload
@st.cache_resource
def load_pipeline(scheduler_name: str):
    pipe = StableDiffusionPipeline.from_pretrained(
        "runwayml/stable-diffusion-v1-5",
        torch_dtype=torch.float16,
        safety_checker=None
    ).to("cuda")

    schedulers = {
        "Euler A": EulerAncestralDiscreteScheduler,
        "DPM++":  DPMSolverMultistepScheduler,
        "DDIM":   DDIMScheduler,
    }
    pipe.scheduler = schedulers[scheduler_name].from_config(pipe.scheduler.config)
    return pipe
Streamlit logic.py / app.py @st.cache_resource float16 Ngrok Google Colab T4
04 · Key Features

Four capabilities, one workflow.

Every feature from the research notebook maps to a UI control. The user goes from text prompt to edited image without writing a line of code.

Text-to-image generation tab in StudioAI
Feature 01
Text-to-Image Generation

Positive + negative prompt, CFG slider, steps, seed control, batch size 1–4. Scheduler selector swaps the sampler without reloading the 3.44 GB model from disk.

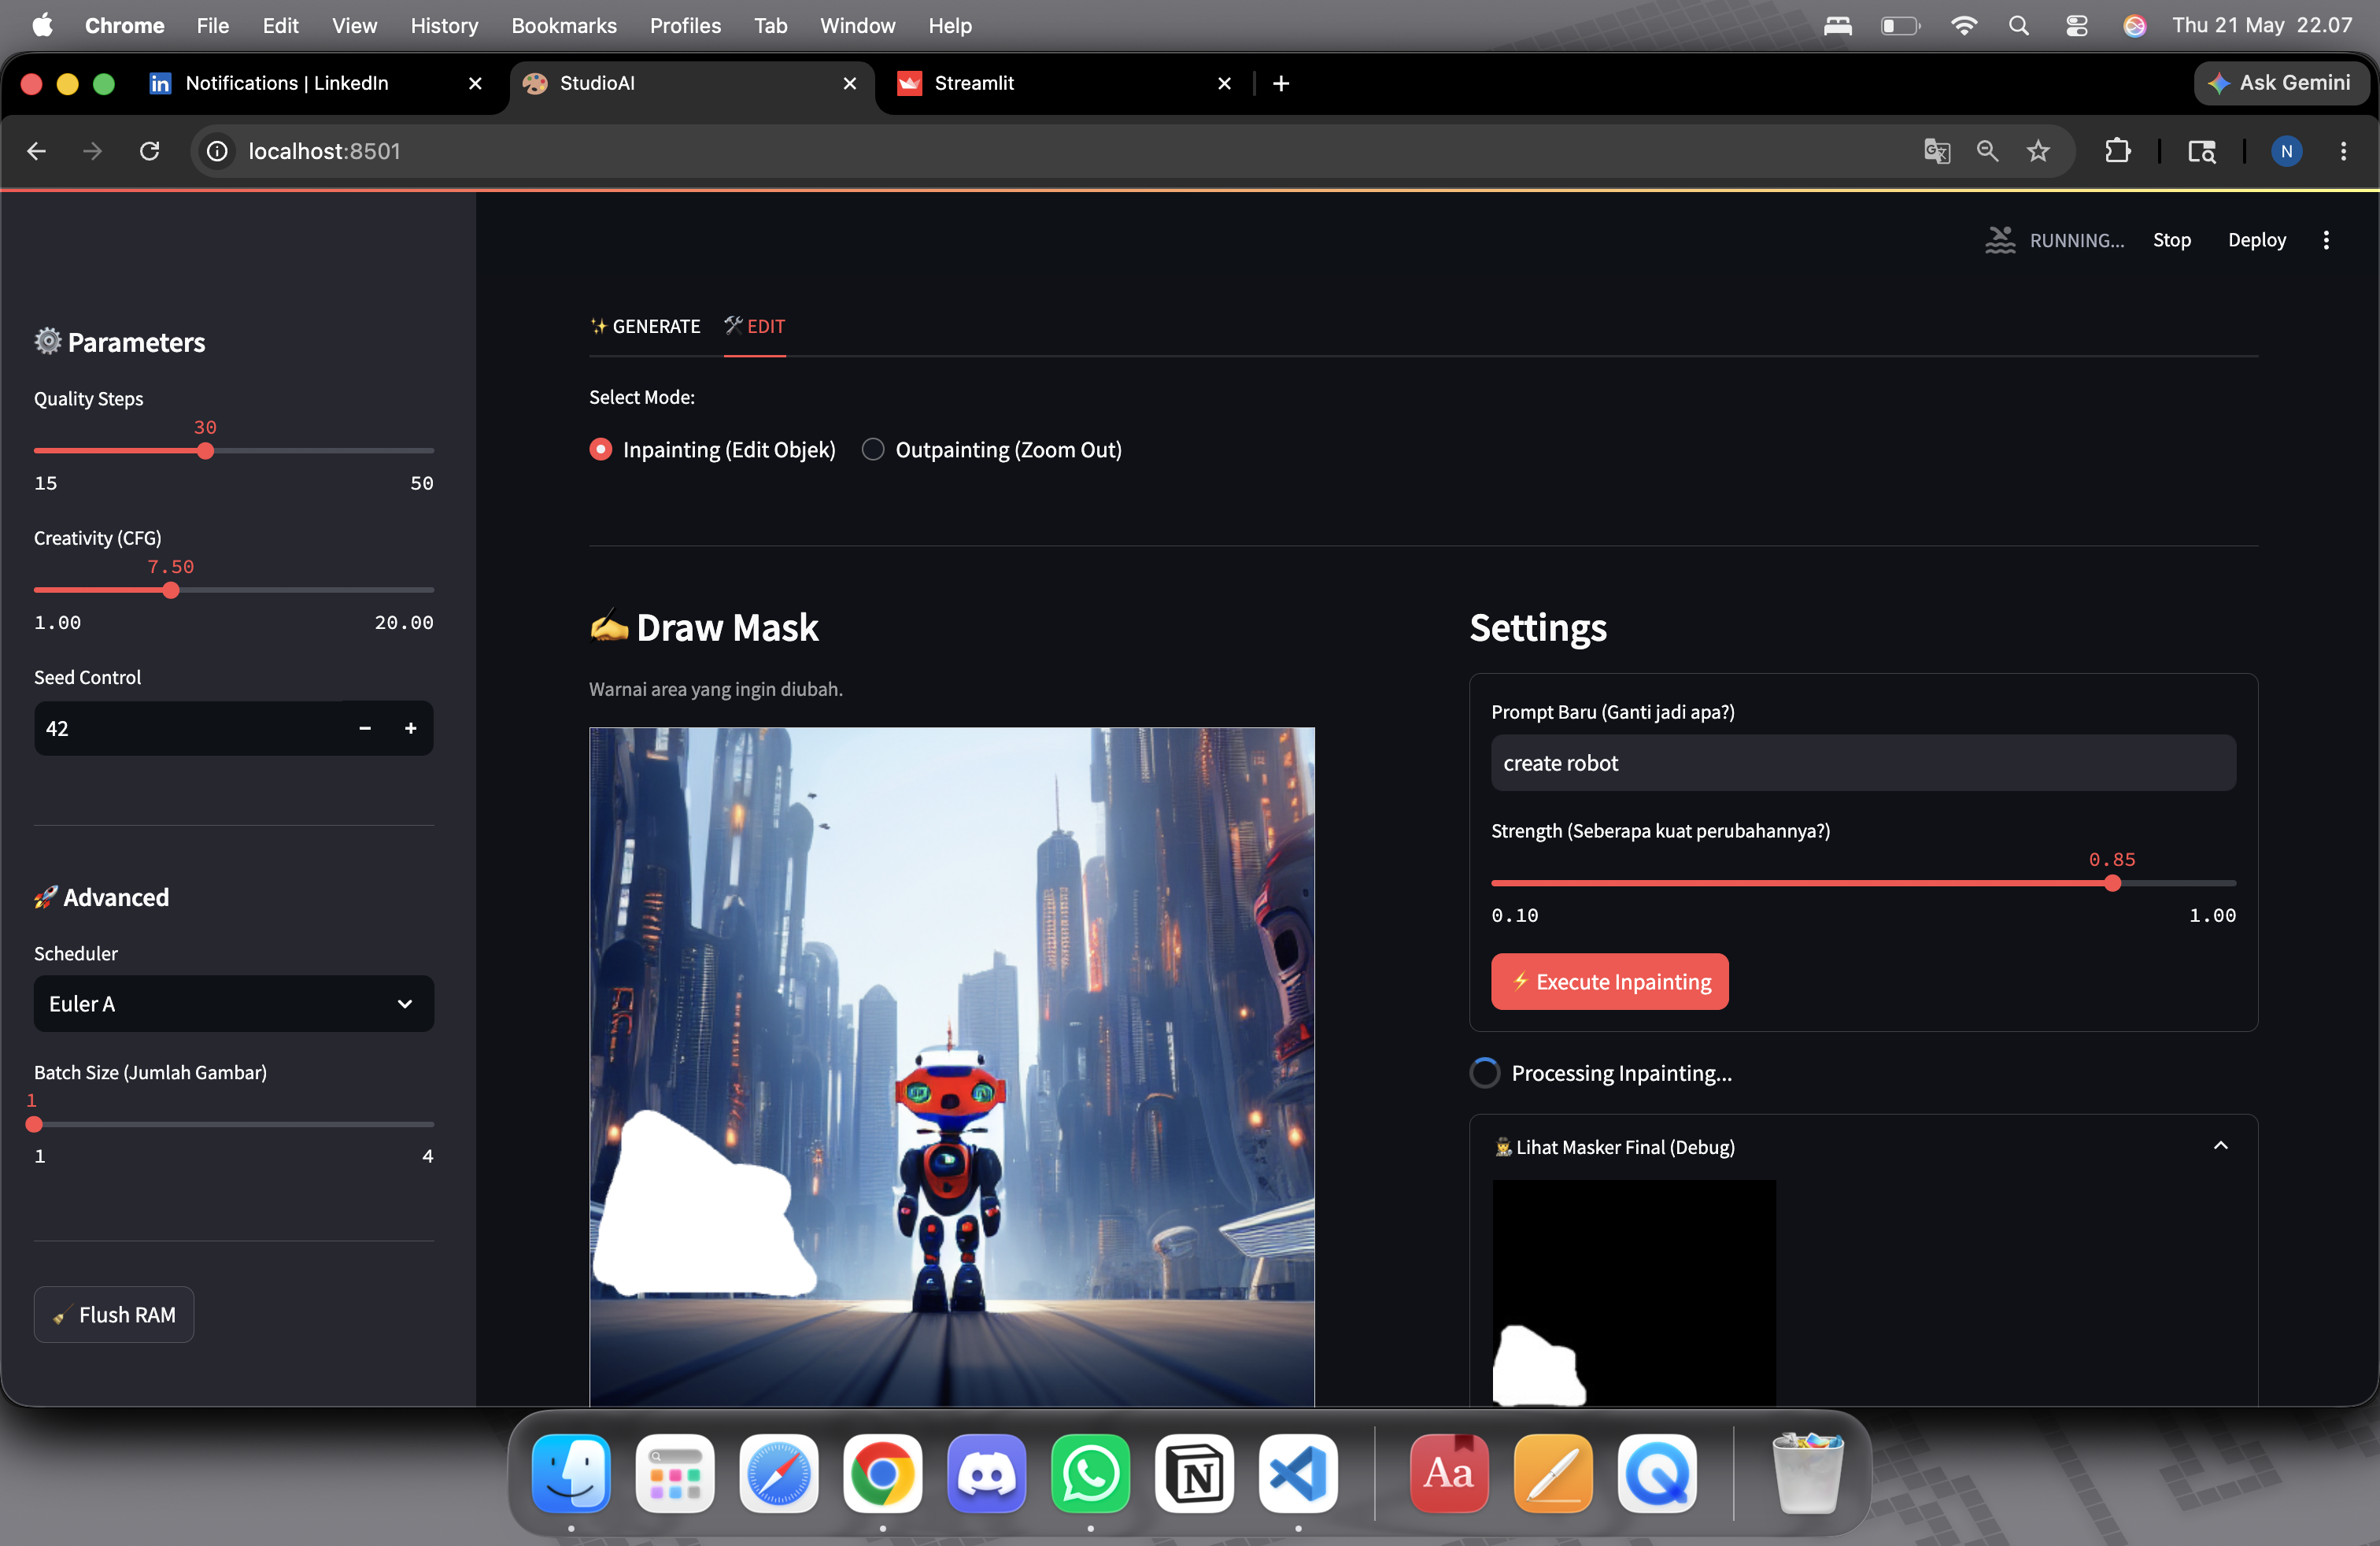
Inpainting tab — drawable canvas for mask selection
Feature 02
Inpainting — Edit Any Region

Paint a mask directly on the generated image in the browser. The brushstroke becomes a binary mask fed into StableDiffusionInpaintPipeline. Only the painted region is regenerated.

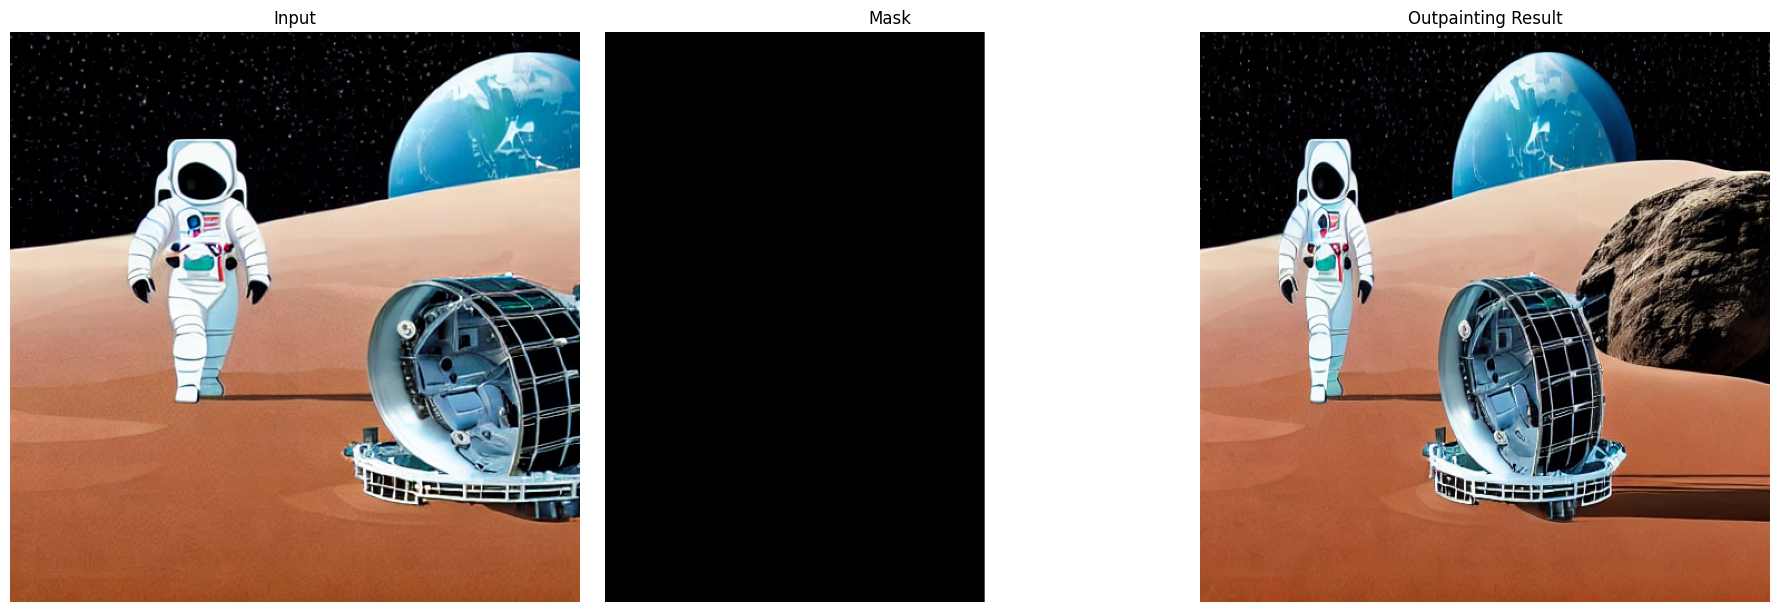
Outpainting — canvas extended seamlessly
Feature 03
Outpainting — Extend the Canvas

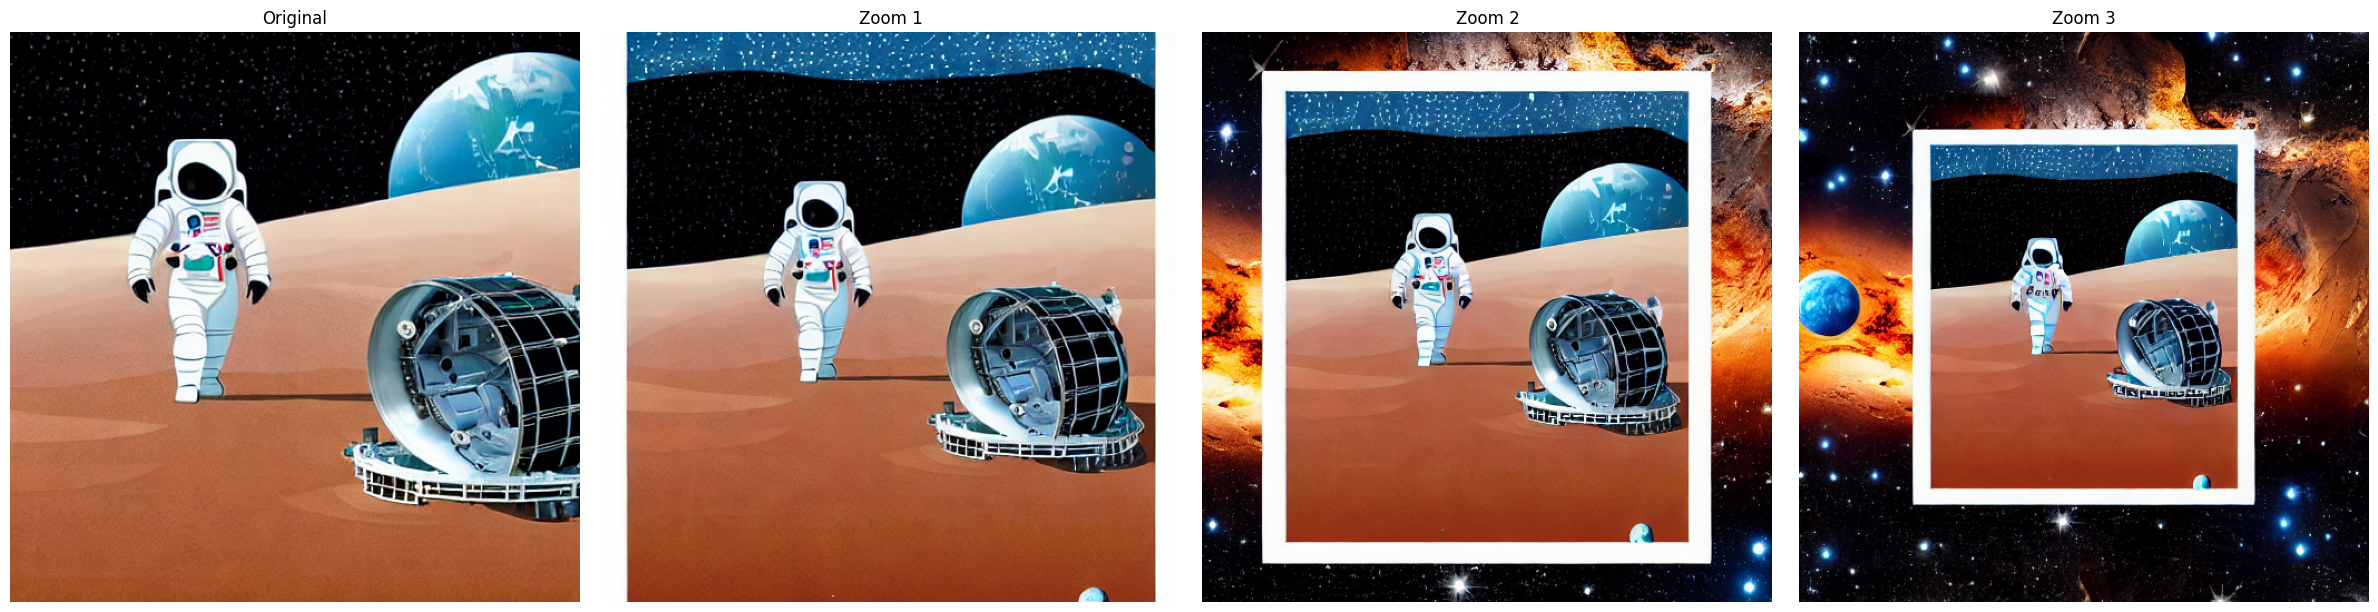
Choose expansion direction (left/right/up/down). The app pads the canvas with a blurred border for context, then inpaints the new edge seamlessly. Zoom-out chains 3+ passes.

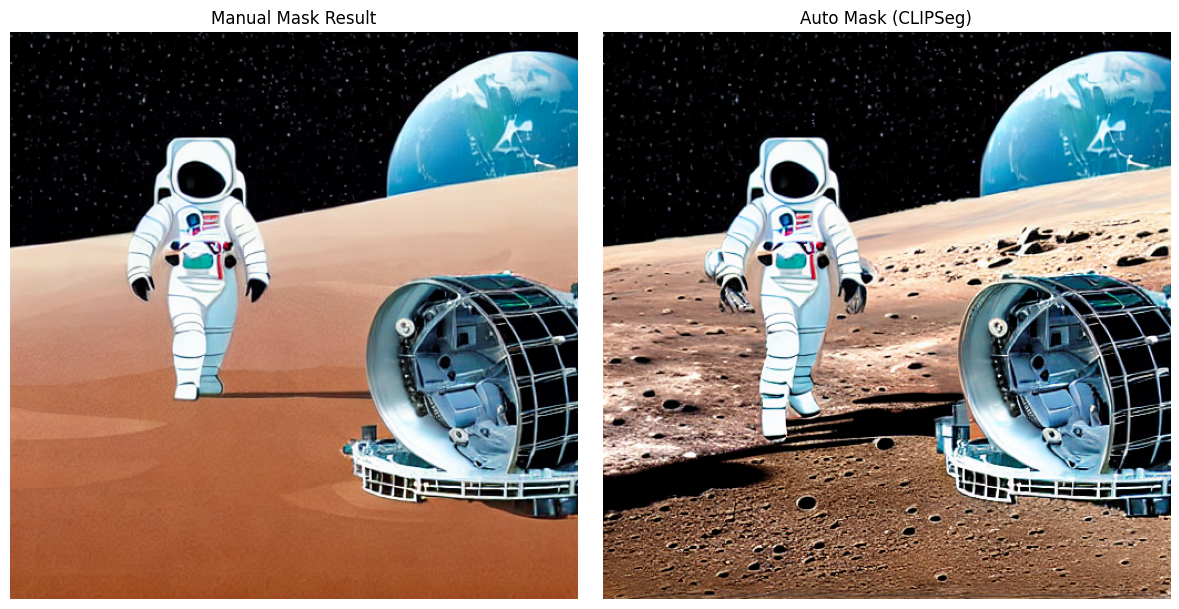
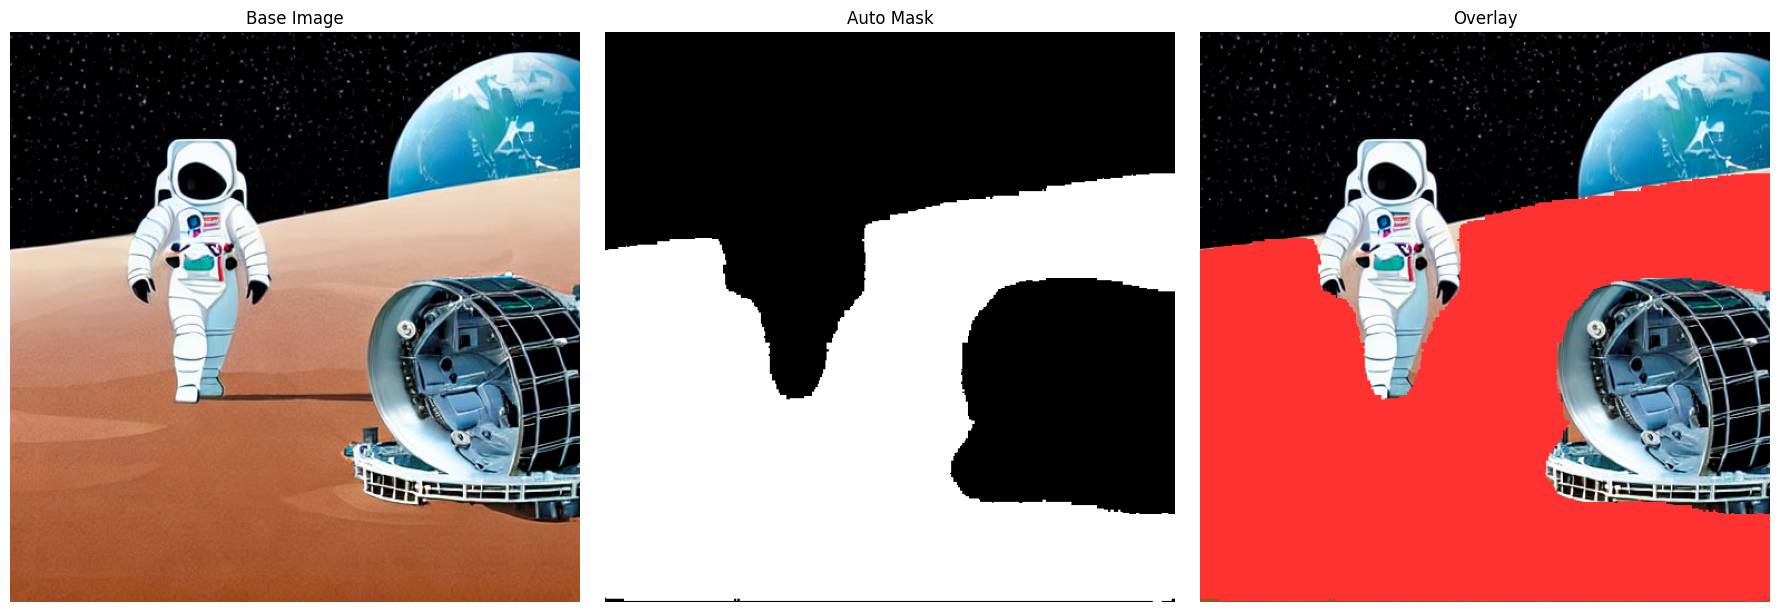
CLIPSeg auto-masking — semantic binary mask from text description
Feature 04
CLIPSeg Auto-Masking

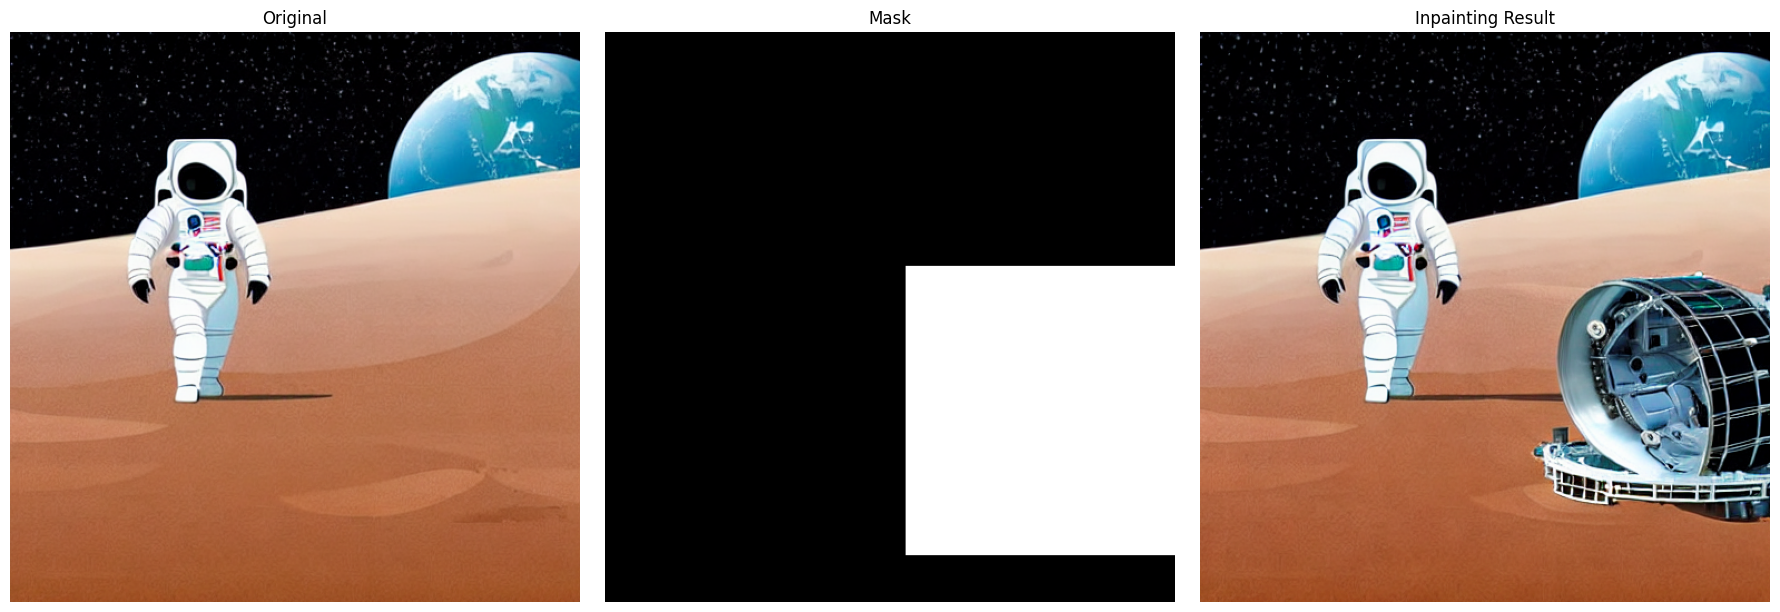
Describe the region in plain language — "the moon surface" — and CLIPSeg computes a semantic mask via text-image similarity. Sigmoid > 0.5 thresholding + dilation converts the heatmap to a clean binary mask.

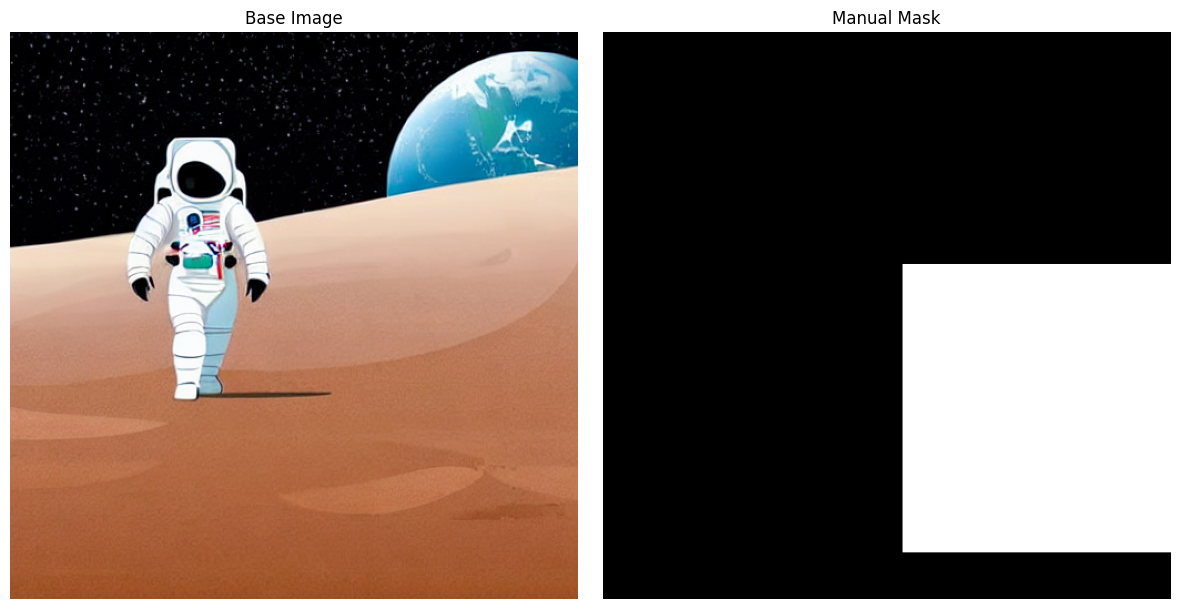
Manual masking — hardcoded NumPy region

Manual masking — pixel coordinates via NumPy slicing

CLIPSeg segmentation heatmap

CLIPSeg segmentation — probability heatmap before thresholding

Zoom-out outpainting — 3 chained iterations

Zoom-out outpainting — 3 chained passes, original scene at center

05 · Experiment Design

Three parameters, systematic comparison.

Before building anything interactive, I ran controlled experiments — one variable at a time, everything else fixed. The goal was to build a mental model of how each parameter shapes the output.

G
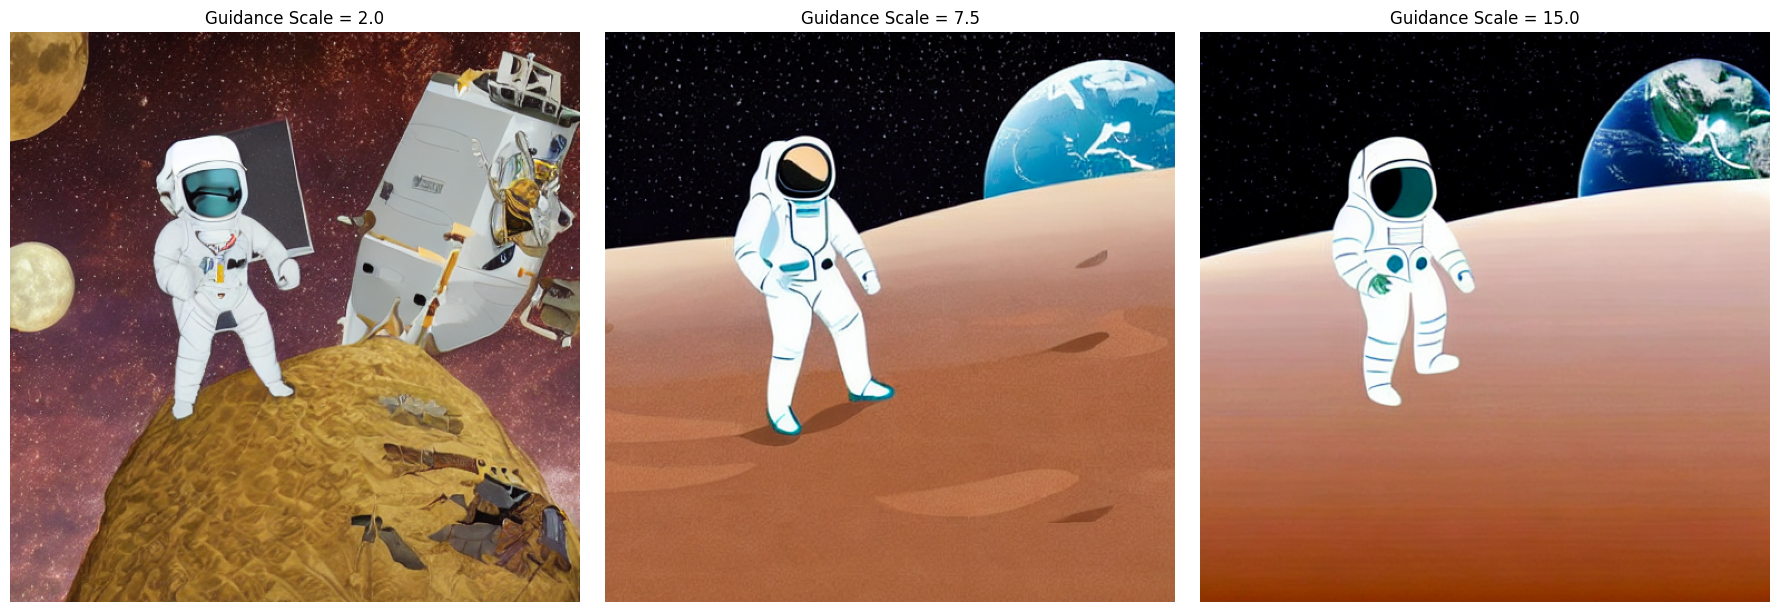
Guidance Scale (CFG)
How strictly does the model follow the prompt?
Tested at 2.0, 7.5, and 15.0. Low CFG = creative but loose. High CFG = over-saturated, loses coherence.
Optimal: 7.5 — best balance of fidelity and quality
S
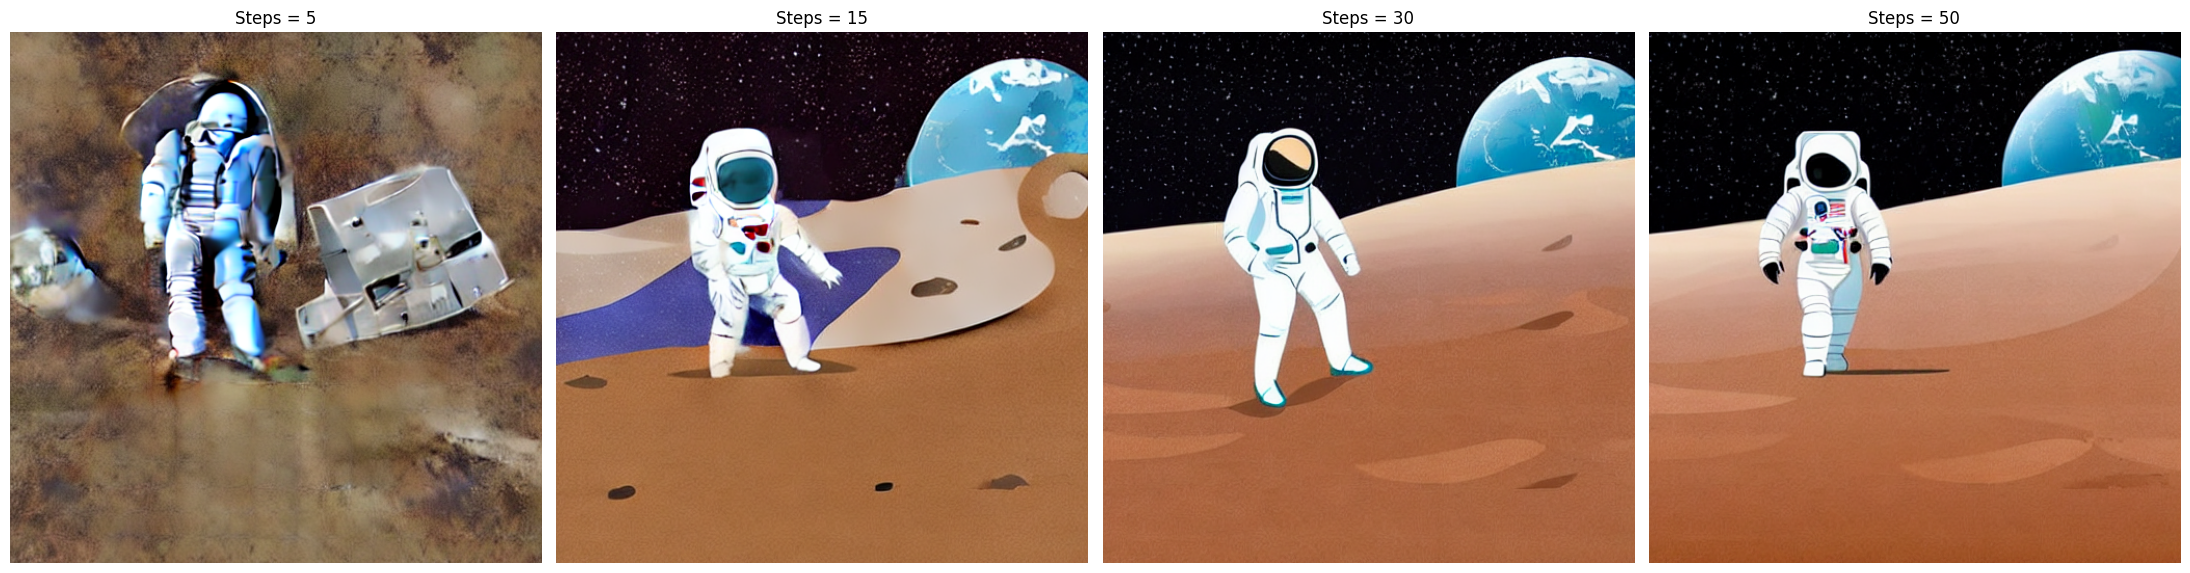
Inference Steps
Quality vs. speed tradeoff
Tested at 5, 15, 30, and 50 steps. At 5 the image is incoherent. At 30+ quality plateaus — 50 steps costs 66% more compute for barely visible gain.
Optimal: 30 steps — diminishing returns beyond this
C
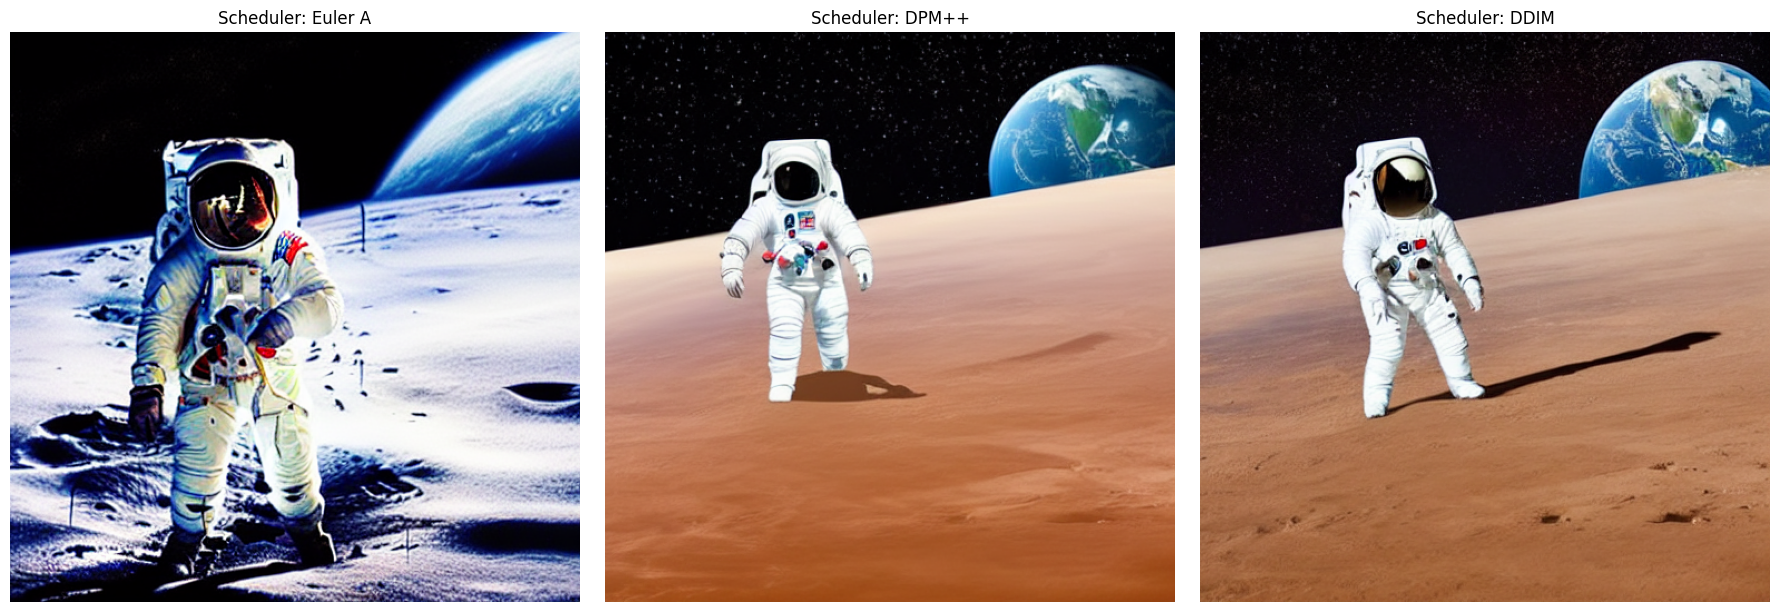
Sampler / Scheduler
Which algorithm fits the target style?
Compared Euler A, DPM++, and DDIM on the same prompt. Euler A trends photorealistic; DPM++ excels at flat 2D illustration; DDIM lands between them.
Optimal: DPM++ for flat 2D illustration target
Guidance scale comparison: CFG 2.0 vs 7.5 vs 15.0

Guidance Scale — CFG 2.0 (loose) · 7.5 (optimal) · 15.0 (over-constrained)

Inference steps comparison: 5, 15, 30, 50

Inference Steps — 5 (incoherent) · 15 · 30 (optimal) · 50 (diminishing returns)

Scheduler Characteristic style Best for Relative speed
Euler A Photorealistic, organic textures Portraits, landscapes Fast
DPM++ Flat, illustrative, clean edges 2D illustration, icons Fast
DDIM Balanced, deterministic Reproducible editing workflows Slower
Scheduler comparison: Euler A, DPM++, DDIM

Scheduler comparison — same prompt, same seed. Euler A (photorealistic) · DPM++ (flat illustration, chosen) · DDIM (balanced)

CFG Scale Inference Steps Euler A DPM++ DDIM Seed Control
06 · Technical Challenges

Three things that broke — and what I did about them.

1
GPU memory exhaustion — the app crashed mid-demo

The app crashed mid-demo.

During batch generation followed by inpainting on a Colab T4 GPU (16 GB VRAM), I hit an out-of-memory error. The pipeline alone sits at ~6 GB. Activations during inference push the peak to ~10 GB. Leftover tensor references from earlier calls filled the rest. The session crashed cleanly — which meant starting over.

The fix required two things: loading with float16 to halve the model footprint, and explicitly clearing GPU cache between operations via torch.cuda.empty_cache() + gc.collect(). The "Flush RAM" button in the app isn't cosmetic — it's the difference between an app that survives a demo and one that doesn't.

2
CLIPSeg mask quality — too soft for inpainting

CLIPSeg gave me probabilities, not a mask.

I expected CLIPSeg to hand me a clean binary mask for the "moon surface" region. What I got was a heatmap — soft probabilities across every pixel. Running inpainting on that directly produced blurry, incoherent results at the boundary. The model didn't know where to stop changing things.

The fix: threshold at sigmoid > 0.5 to get a hard binary, then apply a dilation pass to extend the mask slightly beyond the detected segment. That gives the inpainting model a clean boundary and enough edge overlap to blend. Works well for objects with clear visual contrast; background textures remain inconsistent.

3
Outpainting consistency — style drift across iterations

The style drifts when you chain passes.

Pass one looks good. Pass two is fine. By pass three, the line weight is heavier and the palette is warmer than the original. Each generation step introduces micro-variations that compound. The new content is thematically correct — still a moon surface — but the style has wandered.

Keeping strength low (0.5) and front-loading the style in every prompt ("flat 2D illustration, clean vector lines, pale blue palette") helps. It doesn't eliminate the drift. This is a known limitation of iterative inpainting — fixing it properly requires a fine-tuned outpainting model. I documented it as a known tradeoff, not a solved problem.

07 · Results & Learnings

What building this actually taught me.

This was a class assignment I turned into a real engineering project. The key shifts in how I understand generative AI:

"I didn't just learn how to generate images. I learned what breaks when you run generative models interactively — and that's the part no tutorial covers."
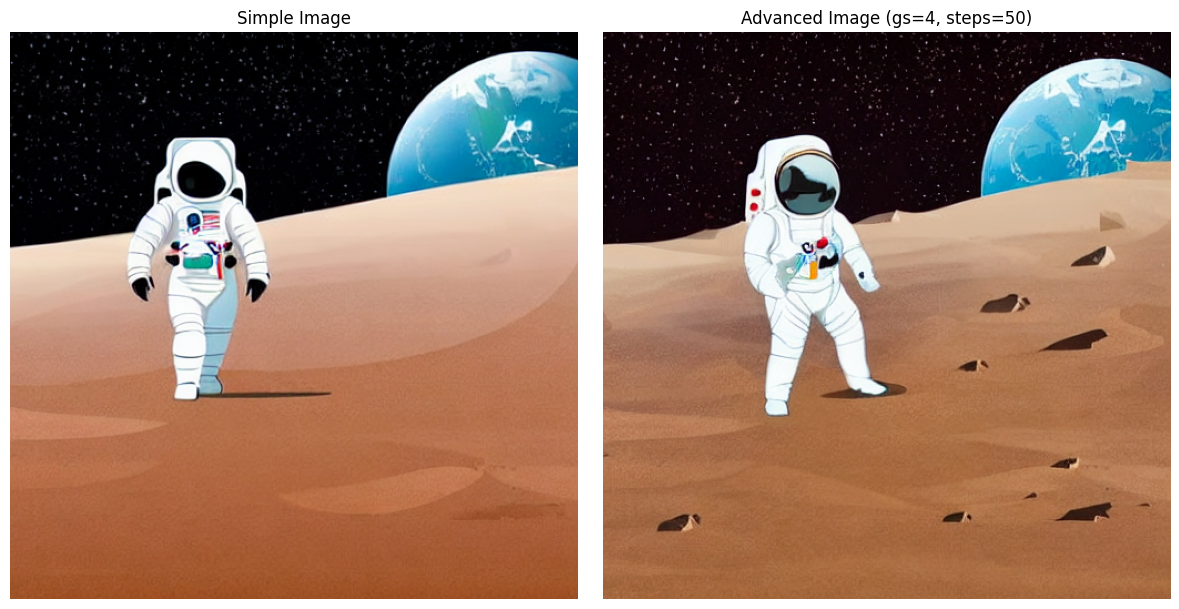
Single-pass vs base+refiner two-stage generation

Single-pass (left) vs base+refiner (right) — edges and texture visibly sharper after refinement pass.

Inpainting result — broken satellite added to moon landscape

Inpainting result — broken satellite inserted into masked region using CLIPSeg auto-mask + new prompt.

Next

See more of what I've built.

Bangkit BFGAI Challenge — solo submission, built in one sprint, zero external assets. The notebook, app code, and demo video are all available. If you want to dig into the CLIPSeg integration, outpainting chain, or session state management, I can walk through it directly.